PodBreakout Mini and Teensy
Thursday, 15 April 2010
A couple of weeks ago Paul at pjrc.com, the maker of Teensy, kindly sent me one to review. A few days after that Mike at Kineteka sent me a PodBreakout Mini to try. Mike also sent me a PodSocket but I’ve not had a chance to mess with it; could be handy for analyzing auth chip serial shenanigans once my Openbench arrives.
The Teensy and the PodBreakout Mini seem like a match made in much-smaller-iPod-serial-remote-heaven, no? Let’s see…
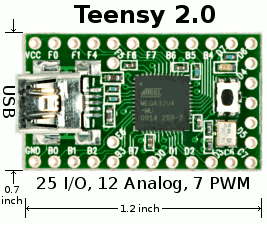
The Teensy 2.0 that Paul sent me is based on the ATMEGA32U4. What makes this chip particularly interesting is that it has a real USB interface, rather than just a serial port with an FTDI chip in front of it doing serial-to-USB. That means you can use it to interact with a host computer as if it were a USB keyboard or mouse, for example. Ladyada has a recent project using this feature of the Teensy. The ATMEGA32U4 also has a regular hardware serial port - that’s going to come in handy in a minute.
The Teensy can be programmed a few different ways. I used the Teensy Loader which comes in versions for OS X, Windows and Linux; I used the Linux version on my 64-bit Ubuntu 9.10 box and it worked fine, barring some minor device file quirkiness in Arduino Serial mode (which Paul tells me seems to be specific to 9.10).
What’s particularly handy for me is that Paul has done a lot of work to integrate the Teensy with the Arduino IDE. Following his instructions I added the Teensy board types very easily using the script he provides.You run the Arduino IDE and the Teensy Loader simultaneously; when you verify a sketch the Teensy Loader detects this and magically uploads the sketch to the Teensy for you; that is you don’t need to (and can’t) use the upload button in the Arduino IDE. It’s pretty slick.
Once I had Blink up and running I set about seeing if my iPodSerial library would work. The usual Arduino
I didn’t feel like hooking up a switch so I just tweaked the play/pause example sketch to toggle every few seconds. I tried this and it worked first time! (Well my code didn’t first time, but the electronics all did).
Now by default the Teensy comes configured for 5V, but there are instructions on how to switch it to 3.3V using an optional 3.3V regulator, which Paul had kindly included with my review Teensy. I followed them without any problems.
WIth the board converted I had to tell the Arduino IDE to clock the Teensy at 8MHz instead of 16MHz (it’s not rated for 16MHz when operating at 3.3V although it may work just fine, depending on what you’re doing with it). This was just a matter of editing the
With the Teensy operating at 3.3V you no longer need a Logic Level Converter between it and the iPod, since both the serial ports are now operating at 3.3V.
This is when I broke out the PodBreakout Mini that Mike had sent me. It doesn’t have all 30 pins but it has what they call the “most commonly used” pins: 1, 3, 4, 5, 6, 8, 13, 12, 21, 23, 25, 27, 30. 12 and 13 are the serial port, so that’s good. I wasn’t sure what to do about GND though — I’d been using pin 11. I checked with Mike and he said they hadn’t observed any differences between the grounds, so I went with pin 1.
Here’s the final setup (click-through to Flickr for eXtreme closeup):

It is a nice compact setup, it only needs three wires (Tx, Rx and GND), it doesn’t need a converter board in the middle, and most importantly it works perfectly!
The PodBreakout Mini’s board fits entirely inside the usual white plastic case (which it comes with), so it ought to be much more robust than the full-size PodBreakout boards I’ve been using up until now, where the wide board is hanging out the back of the connector.
The Teensy seems to be a great value at $18 ($19 if you get the 3.3V regulator to go with it), and the size is nice too. I’m going to start playing around with its USB features when I find some more time.
Thanks again to Paul and Mike for sending me cool things to play with, with no strings attached.
The Teensy and the PodBreakout Mini seem like a match made in much-smaller-iPod-serial-remote-heaven, no? Let’s see…
The Teensy 2.0 that Paul sent me is based on the ATMEGA32U4. What makes this chip particularly interesting is that it has a real USB interface, rather than just a serial port with an FTDI chip in front of it doing serial-to-USB. That means you can use it to interact with a host computer as if it were a USB keyboard or mouse, for example. Ladyada has a recent project using this feature of the Teensy. The ATMEGA32U4 also has a regular hardware serial port - that’s going to come in handy in a minute.
The Teensy can be programmed a few different ways. I used the Teensy Loader which comes in versions for OS X, Windows and Linux; I used the Linux version on my 64-bit Ubuntu 9.10 box and it worked fine, barring some minor device file quirkiness in Arduino Serial mode (which Paul tells me seems to be specific to 9.10).
What’s particularly handy for me is that Paul has done a lot of work to integrate the Teensy with the Arduino IDE. Following his instructions I added the Teensy board types very easily using the script he provides.You run the Arduino IDE and the Teensy Loader simultaneously; when you verify a sketch the Teensy Loader detects this and magically uploads the sketch to the Teensy for you; that is you don’t need to (and can’t) use the upload button in the Arduino IDE. It’s pretty slick.
Once I had Blink up and running I set about seeing if my iPodSerial library would work. The usual Arduino
Serial object isn’t of type HardwareSerial for the Teensy so I had to tweak the library to take a HardwareSerial object in its constructor rather than defaulting to Serial. Other than that it was fine. Again Paul has good information about the differences. I think I could probably just #ifdef based on the board type so the same version of the library would work for the Teensy or regular Arduino boards. I haven’t done this yet though, so the version on github won’t currently compile for the Teensy without the aforementioned minor tweaking.I didn’t feel like hooking up a switch so I just tweaked the play/pause example sketch to toggle every few seconds. I tried this and it worked first time! (Well my code didn’t first time, but the electronics all did).
Now by default the Teensy comes configured for 5V, but there are instructions on how to switch it to 3.3V using an optional 3.3V regulator, which Paul had kindly included with my review Teensy. I followed them without any problems.
WIth the board converted I had to tell the Arduino IDE to clock the Teensy at 8MHz instead of 16MHz (it’s not rated for 16MHz when operating at 3.3V although it may work just fine, depending on what you’re doing with it). This was just a matter of editing the
boards.txt file to cut-and-paste an existing section to make a new variant with the slower clock speed (the build_f_cpu line below):myteensy2_ser.name=Teensy 2.0 (USB Serial) - 3.3 volts
myteensy2_ser.upload.protocol=halfkay
myteensy2_ser.upload.maximum_size=32256
myteensy2_ser.upload.speed=38400
myteensy2_ser.upload.disable_flushing=true
myteensy2_ser.upload.avrdude_wrapper=teensy_reboot
myteensy2_ser.build.mcu=atmega32u4
myteensy2_ser.build.f_cpu=8000000L
myteensy2_ser.build.core=teensy_serial
myteensy2_ser.build.post_compile_script=teensy_post_compile
With the Teensy operating at 3.3V you no longer need a Logic Level Converter between it and the iPod, since both the serial ports are now operating at 3.3V.
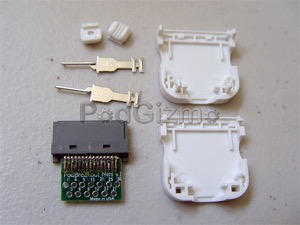
This is when I broke out the PodBreakout Mini that Mike had sent me. It doesn’t have all 30 pins but it has what they call the “most commonly used” pins: 1, 3, 4, 5, 6, 8, 13, 12, 21, 23, 25, 27, 30. 12 and 13 are the serial port, so that’s good. I wasn’t sure what to do about GND though — I’d been using pin 11. I checked with Mike and he said they hadn’t observed any differences between the grounds, so I went with pin 1.
Here’s the final setup (click-through to Flickr for eXtreme closeup):
It is a nice compact setup, it only needs three wires (Tx, Rx and GND), it doesn’t need a converter board in the middle, and most importantly it works perfectly!
The PodBreakout Mini’s board fits entirely inside the usual white plastic case (which it comes with), so it ought to be much more robust than the full-size PodBreakout boards I’ve been using up until now, where the wide board is hanging out the back of the connector.
The Teensy seems to be a great value at $18 ($19 if you get the 3.3V regulator to go with it), and the size is nice too. I’m going to start playing around with its USB features when I find some more time.
Thanks again to Paul and Mike for sending me cool things to play with, with no strings attached.