Pinging Peanuts
Tuesday, 14 April 2009
I was in need of a project to play with the Parallax PING))) sensor. Fortunately, my mother-in-law had recently donated one of those birthday cards that plays a tune to my could-come-in-handy-for-a-project pile. So I decided to use an Arduino with the PING))) to turn the tune on when something got close to it.
The first step was to remove the sound module from the birthday card, which was pretty easy. I then removed the 3V coin cell battery and soldered on power leads in its place.
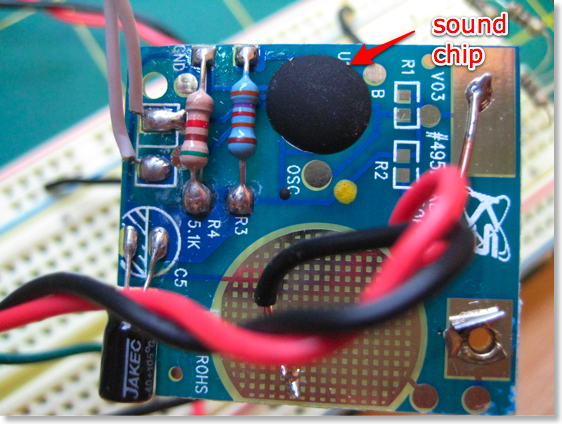
Here’s a close-up:

The sound chip is buried under that black blob; beyond that there’s just a couple of resistors, a capacitor, and a pair of white wires leading to the speaker.
The Arduino’s digital output pins operate at 5V when set to HIGH. I wanted to keep things simple on the control side, so I tried powering the sound module at 5V and it worked without any smoke or other obvious ill-effects. That meant that I could drive it directly, without having to step the voltage down. I probably should have checked the power draw to make sure that I wasn’t going to overdrive the digital outputs on my Arduino, but I figured it would be fine so I didn’t bother. I could also have tried knocking down the apparent voltage via one of the Arduino’s PWM outputs or just stuck in an inline resistor, but again I was trying to keep it as simple as possible. So I just hooked the negative lead from the sound module to a ground connection on the Arduino, and the positive lead to digital pin 4.
On the software side, I started from the example sketch for the PING))) that comes with the Arduino IDE as of version 014 (it’s at Sketchbook/Examples/Sensors/Ping) and tweaked it to do what I wanted.
My sketch polls the PING))) sensor; if the distance reading that it returns is less than five inches, the sketch sets the digital pin connected to the sound module to HIGH, otherwise it sets it to LOW. And that’s it! I love how the Arduino enables you create simple things like this in such a short space of time. The sketch is here if you’re interested.
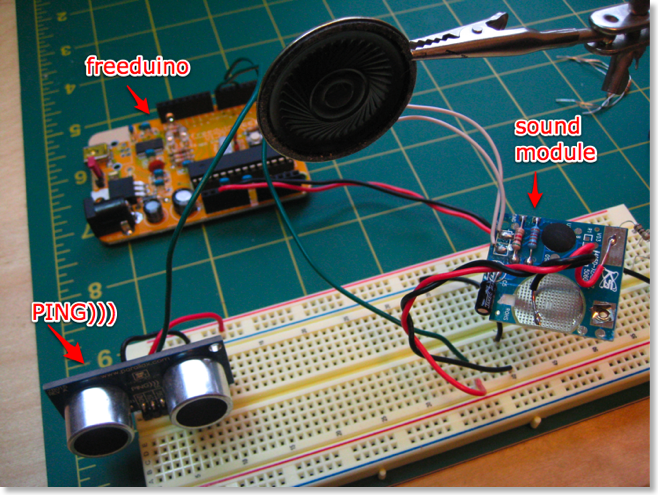
Here’s the final setup, showing the Freeduino (an Arduino clone) in the background:

And here’s a video of it in action:
Note:
If you use Linux and have version 4.3.0 of avr-gcc (which is the default in Ubuntu 8.10), then due to a bug discussed here you won’t get valid readings from the PING))) sensor (you’ll get enormous distance readings back, or at least I did). I upgraded to the Jaunty version and then it worked for me just fine.
The first step was to remove the sound module from the birthday card, which was pretty easy. I then removed the 3V coin cell battery and soldered on power leads in its place.
Here’s a close-up:

The sound chip is buried under that black blob; beyond that there’s just a couple of resistors, a capacitor, and a pair of white wires leading to the speaker.
The Arduino’s digital output pins operate at 5V when set to HIGH. I wanted to keep things simple on the control side, so I tried powering the sound module at 5V and it worked without any smoke or other obvious ill-effects. That meant that I could drive it directly, without having to step the voltage down. I probably should have checked the power draw to make sure that I wasn’t going to overdrive the digital outputs on my Arduino, but I figured it would be fine so I didn’t bother. I could also have tried knocking down the apparent voltage via one of the Arduino’s PWM outputs or just stuck in an inline resistor, but again I was trying to keep it as simple as possible. So I just hooked the negative lead from the sound module to a ground connection on the Arduino, and the positive lead to digital pin 4.
On the software side, I started from the example sketch for the PING))) that comes with the Arduino IDE as of version 014 (it’s at Sketchbook/Examples/Sensors/Ping) and tweaked it to do what I wanted.
My sketch polls the PING))) sensor; if the distance reading that it returns is less than five inches, the sketch sets the digital pin connected to the sound module to HIGH, otherwise it sets it to LOW. And that’s it! I love how the Arduino enables you create simple things like this in such a short space of time. The sketch is here if you’re interested.
Here’s the final setup, showing the Freeduino (an Arduino clone) in the background:

And here’s a video of it in action:
Note:
If you use Linux and have version 4.3.0 of avr-gcc (which is the default in Ubuntu 8.10), then due to a bug discussed here you won’t get valid readings from the PING))) sensor (you’ll get enormous distance readings back, or at least I did). I upgraded to the Jaunty version and then it worked for me just fine.