iPod Remote
Monday, 07 September 2009
3/2/2010 UPDATE: See update post.
4/14/2010 UPDATE: See here if you have a v1.4 PodBreakout board.
UPDATE: Better photos up on Flickr.
I've been desperately short of Arduino play time in the last few months, but I did finally find time to finish my Arduino-based iPod remote (well, version 1.0 of it anyway). My remote has a single button that toggles between Play and Pause on the iPod. I wanted one like that for my car so I could easily pause my iPod Touch without having to: find it, unlock it; find the touch-screen pause button; and finally, pause it.
So how to go about this?
Well, the iPod dock connector actually exposes a serial connection to the iPod. You can see this on the pinout, the best online version of which I found on pinouts.ru. This serial connection can be used by docks, or in my case an Arduino, to interact with the iPod. The iPod speaks AAP on its serial port: the Apple Accessory Protocol. There are several modes in AAP that you can interact with an iPod over serial in, but Simple Remote (mode 0x02) is by far the easiest, as it has no responses to deal with. Simple Remote mode allows you to play and pause the iPod, change tracks, adjust the volume and so on. Since that covered my needs it's what I implemented first. (I've also implemented part of Advanced Remote (mode 0x04) as we'll briefly see later.)
With the pinout and protocol documentation in hand I ordered a couple of cheap iPod charging cables to hack on. However, when they arrived I realized that my soldering skillz were nowhere near good enough to make the connections I was going to need. Luckily I am not the first person to have this problem, and SparkFun has the solution: the PodGizmo breakout board:
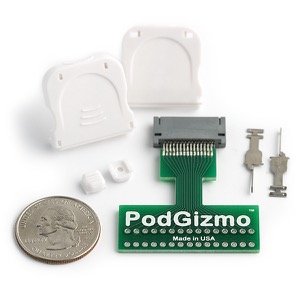
The PodGizmo has connections to all the pins on the dock connector and gives you through-holes to solder things onto: perfect!
I proceeded to hook up wires to the serial I/O pins (12 and 13), serial ground (11) and to pin 21: the rather curious-sounding "Accesory Indicator / Serial Enable" pin. The level of resistance between this pin and ground apparently tells the iPod what kind of accessory it is connected to. Since I wanted to use the serial interface, I went with a 500kOhm resistor, to select the "related to serial communication / used to enable serial communications Used in Dension Ice Link Plus car interface" mode.
With my connections made, I was about to hook it up to my Arduino, but then I remembered that the serial output of the Arduino is 5V. I wasn't sure what the iPod wanted but I guessed it probably only wanted 3.3V. I didn't know what to do, so I googled around for a bit looking at various level-shifting solutions. Some you could make from a few components but I was concerned they wouldn't be able to switch fast enough to get a good serial signal. Luckily, during my googling I came across another SparkFun gem: the BOB-08745 Logic Level Converter.
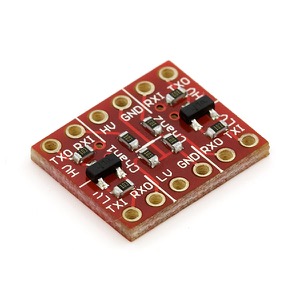
This little guy lets you talk serial (or I2C, SPI, etc) at one voltage on one side and another voltage on the other side. Again: perfect!
So with the level converter added to the mix, I was ready to hook it up to the Arduino.
Of course, hooking up wasn't going to do much without some code to talk Apple Accessory Protocol, so that was the next task. I wrote an Arduino library for the parts of the Apple Accessory Protocol that I was going to need, and a bit more besides. I posted it on github in case anyone else wanted to use it. It comes with a couple of example sketches: a play/pause one using Simple Remote mode (wonder where I got that idea from); and one for Advanced Remote mode that pulls back information for the track that the iPod is currently playing. The latter could form the basis of an Arduino-based dock that showed track information on an LCD display, for example.
Here's the example Simple Remote sketch. I'm using almost exactly this for my remote, the only difference being that I'm using an active-low on my switch with the Arduino's internal pull-up to avoid having an external resistor for the switch:
During development I used an Arduino Mega so that I could have a real serial port for the iPod and a real one for debugging messages. I probably could just have used the SoftwareSerial library with a regular Arduino for debugging, but since I had the Mega around, I used it. My library defaults to having debugging messages disabled, but you can configure it in your
Once I had it working to my liking I transferred the sketch over to an Arduino Nano, since it would fit in an Altoids tin (of course). This is what it looked like at this point:
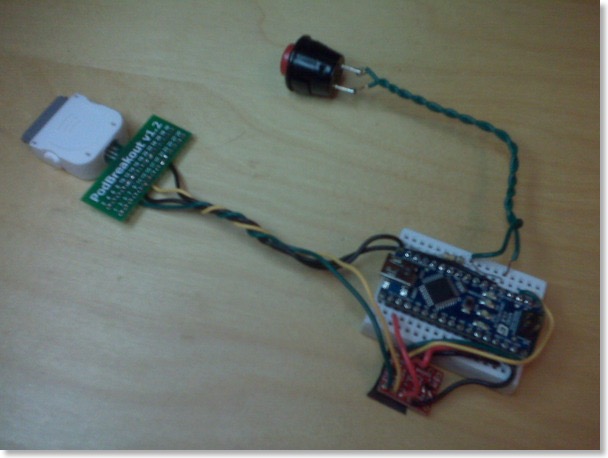
You can see I'm just using a simple push button for the play/pause action. The Nano is sitting on a little breadboard and you can just see the resistor I have connected to pin 21. I probably should have just put the resistor on the PodGizmo breakout board, but I didn't.
Next came testing it with my iPod Touch:
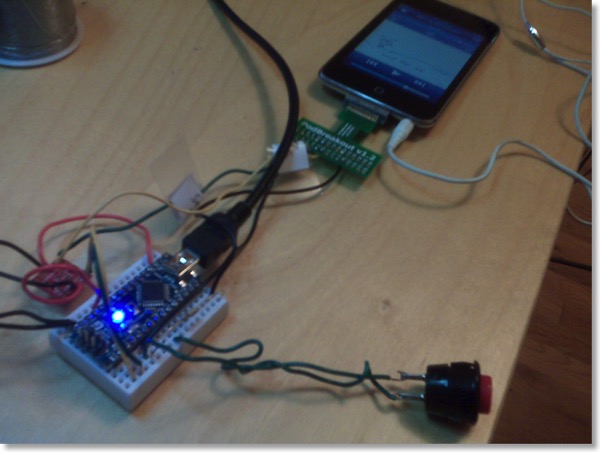
Everything checked out, so next I switched out the little button for a REALLY BIG BUTTON:
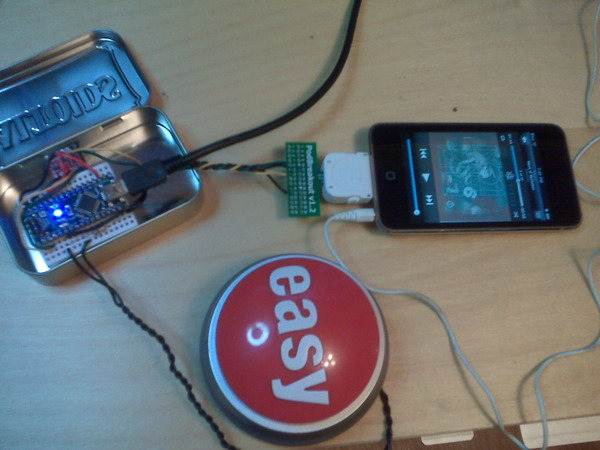
As you can see it's an Easy Button from Staples; I just took out the Easy Button's batteries, soldered wires to either side of its switch, and routed them out through the hole conveniently left by the battery lid. The Nano is sitting on an Altoids tin at this stage, but it's not yet in the tin. That came next, thanks to Mr Dremel:
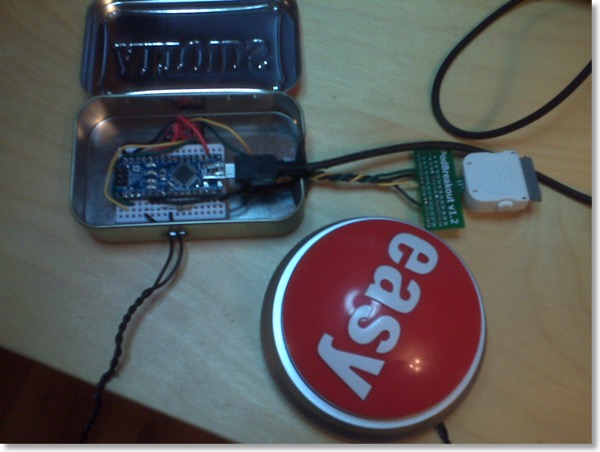
I took it out to the car, hooked up the Nano's USB cable to my USB car adaptor (similar to this one on Amazon, but you can get them lots of places), and tried it out. It worked pretty well, but there was one problem: I was still using a cable to connect the headphone socket on the iPod to the line-in jack on my car. The audio wouldn't go out the headphone socket unless I plugged the dock cable in first and then the headphone cable. As you've probably realized by this point, it was completely stupid of me to still be using a headphone cable: the dock connector has connections for line out! Having caught up with my smarter readers, I took the remote into the lab at work and add hooked up the line-out cable. This gives me true line out instead of the volume-adjusted headphone output, saves wear and tear on the headphone socket on my iPod, and avoids the what-to-connect-first problem, as there's only one thing to connect.
So how does it work? It works great, thanks! The only real quirk I've noticed is that when I first connect it, my 2G iPod Touch will play audio out of its internal 'speaker' for a couple of seconds before realizing that it's connected to the dock and switching over. It even pauses the iPod when I turn off the car, presumably because the iPod sees the dock go away when the Nano loses power.
No doubt someone will point out that the Nano is a gazillion times overpowered to do a couple of serial I/O sequences, and they'd be right. But: I already had the Nano anyway; and I plan on expanding the remote soon (dash-mounted, arduinix-powered, nixie tube track status action anybody?).
4/14/2010 UPDATE: See here if you have a v1.4 PodBreakout board.
UPDATE: Better photos up on Flickr.
I've been desperately short of Arduino play time in the last few months, but I did finally find time to finish my Arduino-based iPod remote (well, version 1.0 of it anyway). My remote has a single button that toggles between Play and Pause on the iPod. I wanted one like that for my car so I could easily pause my iPod Touch without having to: find it, unlock it; find the touch-screen pause button; and finally, pause it.
So how to go about this?
Well, the iPod dock connector actually exposes a serial connection to the iPod. You can see this on the pinout, the best online version of which I found on pinouts.ru. This serial connection can be used by docks, or in my case an Arduino, to interact with the iPod. The iPod speaks AAP on its serial port: the Apple Accessory Protocol. There are several modes in AAP that you can interact with an iPod over serial in, but Simple Remote (mode 0x02) is by far the easiest, as it has no responses to deal with. Simple Remote mode allows you to play and pause the iPod, change tracks, adjust the volume and so on. Since that covered my needs it's what I implemented first. (I've also implemented part of Advanced Remote (mode 0x04) as we'll briefly see later.)
With the pinout and protocol documentation in hand I ordered a couple of cheap iPod charging cables to hack on. However, when they arrived I realized that my soldering skillz were nowhere near good enough to make the connections I was going to need. Luckily I am not the first person to have this problem, and SparkFun has the solution: the PodGizmo breakout board:

The PodGizmo has connections to all the pins on the dock connector and gives you through-holes to solder things onto: perfect!
I proceeded to hook up wires to the serial I/O pins (12 and 13), serial ground (11) and to pin 21: the rather curious-sounding "Accesory Indicator / Serial Enable" pin. The level of resistance between this pin and ground apparently tells the iPod what kind of accessory it is connected to. Since I wanted to use the serial interface, I went with a 500kOhm resistor, to select the "related to serial communication / used to enable serial communications Used in Dension Ice Link Plus car interface" mode.
With my connections made, I was about to hook it up to my Arduino, but then I remembered that the serial output of the Arduino is 5V. I wasn't sure what the iPod wanted but I guessed it probably only wanted 3.3V. I didn't know what to do, so I googled around for a bit looking at various level-shifting solutions. Some you could make from a few components but I was concerned they wouldn't be able to switch fast enough to get a good serial signal. Luckily, during my googling I came across another SparkFun gem: the BOB-08745 Logic Level Converter.

This little guy lets you talk serial (or I2C, SPI, etc) at one voltage on one side and another voltage on the other side. Again: perfect!
So with the level converter added to the mix, I was ready to hook it up to the Arduino.
Of course, hooking up wasn't going to do much without some code to talk Apple Accessory Protocol, so that was the next task. I wrote an Arduino library for the parts of the Apple Accessory Protocol that I was going to need, and a bit more besides. I posted it on github in case anyone else wanted to use it. It comes with a couple of example sketches: a play/pause one using Simple Remote mode (wonder where I got that idea from); and one for Advanced Remote mode that pulls back information for the track that the iPod is currently playing. The latter could form the basis of an Arduino-based dock that showed track information on an LCD display, for example.
Here's the example Simple Remote sketch. I'm using almost exactly this for my remote, the only difference being that I'm using an active-low on my switch with the Arduino's internal pull-up to avoid having an external resistor for the switch:
During development I used an Arduino Mega so that I could have a real serial port for the iPod and a real one for debugging messages. I probably could just have used the SoftwareSerial library with a regular Arduino for debugging, but since I had the Mega around, I used it. My library defaults to having debugging messages disabled, but you can configure it in your
setup() method to route those messages to any serial port you like.Once I had it working to my liking I transferred the sketch over to an Arduino Nano, since it would fit in an Altoids tin (of course). This is what it looked like at this point:

You can see I'm just using a simple push button for the play/pause action. The Nano is sitting on a little breadboard and you can just see the resistor I have connected to pin 21. I probably should have just put the resistor on the PodGizmo breakout board, but I didn't.
Next came testing it with my iPod Touch:

Everything checked out, so next I switched out the little button for a REALLY BIG BUTTON:

As you can see it's an Easy Button from Staples; I just took out the Easy Button's batteries, soldered wires to either side of its switch, and routed them out through the hole conveniently left by the battery lid. The Nano is sitting on an Altoids tin at this stage, but it's not yet in the tin. That came next, thanks to Mr Dremel:

I took it out to the car, hooked up the Nano's USB cable to my USB car adaptor (similar to this one on Amazon, but you can get them lots of places), and tried it out. It worked pretty well, but there was one problem: I was still using a cable to connect the headphone socket on the iPod to the line-in jack on my car. The audio wouldn't go out the headphone socket unless I plugged the dock cable in first and then the headphone cable. As you've probably realized by this point, it was completely stupid of me to still be using a headphone cable: the dock connector has connections for line out! Having caught up with my smarter readers, I took the remote into the lab at work and add hooked up the line-out cable. This gives me true line out instead of the volume-adjusted headphone output, saves wear and tear on the headphone socket on my iPod, and avoids the what-to-connect-first problem, as there's only one thing to connect.
So how does it work? It works great, thanks! The only real quirk I've noticed is that when I first connect it, my 2G iPod Touch will play audio out of its internal 'speaker' for a couple of seconds before realizing that it's connected to the dock and switching over. It even pauses the iPod when I turn off the car, presumably because the iPod sees the dock go away when the Nano loses power.
No doubt someone will point out that the Nano is a gazillion times overpowered to do a couple of serial I/O sequences, and they'd be right. But: I already had the Nano anyway; and I plan on expanding the remote soon (dash-mounted, arduinix-powered, nixie tube track status action anybody?).
Django Time
Wednesday, 02 September 2009
I was back home in Scotland in June and my dad happened to mention a problem he was having at work: he does forensic computer analysis and had written a case tracking system for his department in Access. However, the data model wasn’t normalized and he was finding it difficult to extend it to meet their growing needs. I’m not familiar with Access but I poked around a bit and did some googling, and it seemed like we could get it to at least support a couple of his desired changes, but it wasn’t going to be pretty.
It got me to thinking though, and when I got back to the States, I decided to try out re-implementing the system using Django. Django is a web framework for Python, and I had been meaning to find time to try it out for a while. You define your data models as Python objects and Django handles the ORM to get your data in and out of a database. It also provides APIs to query and manipulate the data easily from Python, and templating to help you display data in web pages.
I won’t presume that I could describe Django better than its authors, however, so here’s its features lifted straight from djangoproject.com:
Object-relational mapper
Define your data models entirely in Python. You get a rich, dynamic database-access API for free — but you can still write SQL if needed.
Automatic admin interface
Save yourself the tedious work of creating interfaces for people to add and update content. Django does that automatically, and it's production-ready.
Elegant URL design
Design pretty, cruft-free URLs with no framework-specific limitations. Be as flexible as you like.
Template system
Use Django's powerful, extensible and designer-friendly template language to separate design, content and Python code.
Cache system
Hook into memcached or other cache frameworks for super performance — caching is as granular as you need.
Internationalization
Django has full support for multi-language applications, letting you specify translation strings and providing hooks for language-specific functionality.
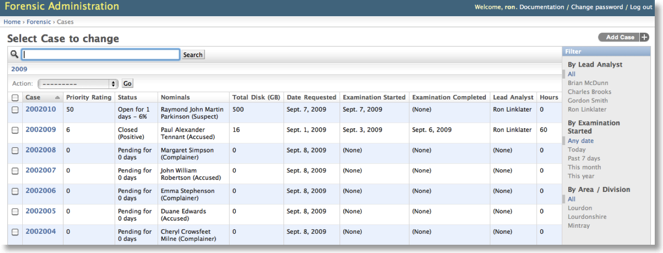
What particularly attracted me to Django is its amazing out-of-the-box administration interface. Django was developed in a news room environment, so they put together a pretty full-featured administration interface that lets journalists enter news articles, mark them for display on the newspaper’s public pages, and so on. The public-facing part of the site then uses Django’s template system in conjunction with is MVC framework to retrieve and present the data entered via the admin interface.
In my use case, the system would only be used by a small number of people, all of whom would have at least some form of administrative access. So, I figured I could get a pretty usable system without having to do any ‘webby’ stuff at all. And that’s been pretty much my experience: the bulk of the system is in two Python source files: one that defines the data model; and one that customizes the administration interface.
Django works with multiple databases, including SQLite, for which I have a definite soft spot. It also comes with a for-development web server built-in. Given the small number of users, I hoped that I could use SQLite and the built-in web server for the final version, thereby saving my dad from having to install and maintain database and web servers. The built-in server isn’t meant to be used in production, but we’ll see how it does. The system doesn’t have enough run time on it yet, but if it proves unreliable then switching to a full web server won’t be too painful. I don’t foresee SQLite being a bottleneck, but if it does we can switch it to MySQL or Postgres or something, although I’d need to convert the data to do that probably.
The Django site has an excellent four-part tutorial that walks you through most of its aspects. It was certainly enough to get me going. The online documentation for the APIs is also very good. It didn’t take long at all to get a proof-of-concept up and running for my dad to try out. We used basecamp to keep track of things as we worked through the nitty gritty of the design, git to track the source, and a couple of Django sites at my web host so my dad could play with the system as it came together (kudos to Andrew at dreamhost for helping me get Passenger WSGI going with Django by the way).
In just a few weeks of working on it spare time the system is up and running, complete with a couple of reports (HTML and CSV) and some features not envisaged at the outset (ain’t that always the way?). I even wrote an importer that took the old cases from Access via a CSV file and imported them into the new one, using Django’s model classes so that I didn’t even have to write a single INSERT statement.
If you're a pythony sort of person then I highly recommend taking a look at Django for your next webby projecty thingy.
Pinging Peanuts
Tuesday, 14 April 2009
I was in need of a project to play with the Parallax PING))) sensor. Fortunately, my mother-in-law had recently donated one of those birthday cards that plays a tune to my could-come-in-handy-for-a-project pile. So I decided to use an Arduino with the PING))) to turn the tune on when something got close to it.
The first step was to remove the sound module from the birthday card, which was pretty easy. I then removed the 3V coin cell battery and soldered on power leads in its place.
Here’s a close-up:
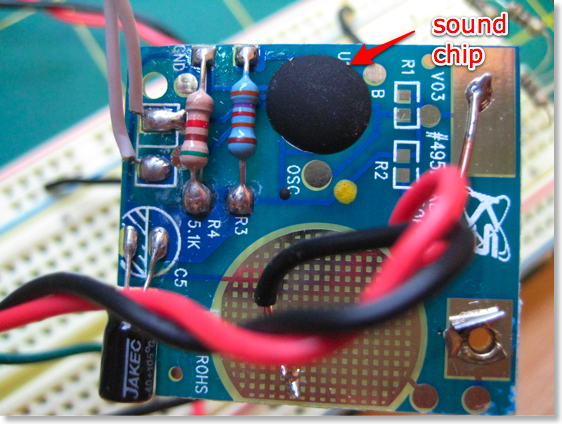
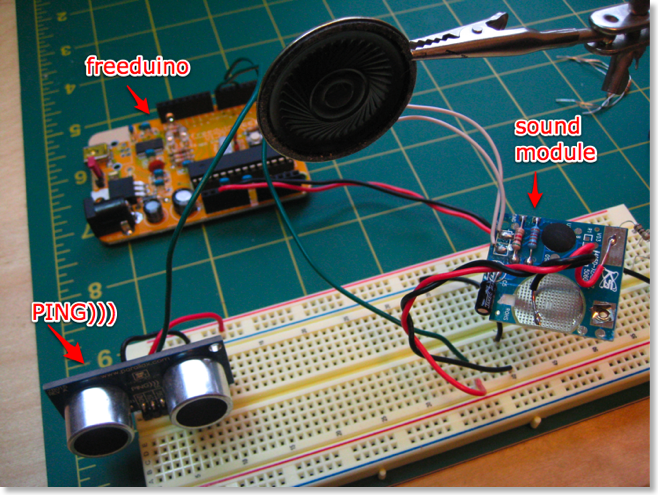
The sound chip is buried under that black blob; beyond that there’s just a couple of resistors, a capacitor, and a pair of white wires leading to the speaker.
The Arduino’s digital output pins operate at 5V when set to HIGH. I wanted to keep things simple on the control side, so I tried powering the sound module at 5V and it worked without any smoke or other obvious ill-effects. That meant that I could drive it directly, without having to step the voltage down. I probably should have checked the power draw to make sure that I wasn’t going to overdrive the digital outputs on my Arduino, but I figured it would be fine so I didn’t bother. I could also have tried knocking down the apparent voltage via one of the Arduino’s PWM outputs or just stuck in an inline resistor, but again I was trying to keep it as simple as possible. So I just hooked the negative lead from the sound module to a ground connection on the Arduino, and the positive lead to digital pin 4.
On the software side, I started from the example sketch for the PING))) that comes with the Arduino IDE as of version 014 (it’s at Sketchbook/Examples/Sensors/Ping) and tweaked it to do what I wanted.
My sketch polls the PING))) sensor; if the distance reading that it returns is less than five inches, the sketch sets the digital pin connected to the sound module to HIGH, otherwise it sets it to LOW. And that’s it! I love how the Arduino enables you create simple things like this in such a short space of time. The sketch is here if you’re interested.
Here’s the final setup, showing the Freeduino (an Arduino clone) in the background:
And here’s a video of it in action:
Note:
If you use Linux and have version 4.3.0 of avr-gcc (which is the default in Ubuntu 8.10), then due to a bug discussed here you won’t get valid readings from the PING))) sensor (you’ll get enormous distance readings back, or at least I did). I upgraded to the Jaunty version and then it worked for me just fine.
The first step was to remove the sound module from the birthday card, which was pretty easy. I then removed the 3V coin cell battery and soldered on power leads in its place.
Here’s a close-up:

The sound chip is buried under that black blob; beyond that there’s just a couple of resistors, a capacitor, and a pair of white wires leading to the speaker.
The Arduino’s digital output pins operate at 5V when set to HIGH. I wanted to keep things simple on the control side, so I tried powering the sound module at 5V and it worked without any smoke or other obvious ill-effects. That meant that I could drive it directly, without having to step the voltage down. I probably should have checked the power draw to make sure that I wasn’t going to overdrive the digital outputs on my Arduino, but I figured it would be fine so I didn’t bother. I could also have tried knocking down the apparent voltage via one of the Arduino’s PWM outputs or just stuck in an inline resistor, but again I was trying to keep it as simple as possible. So I just hooked the negative lead from the sound module to a ground connection on the Arduino, and the positive lead to digital pin 4.
On the software side, I started from the example sketch for the PING))) that comes with the Arduino IDE as of version 014 (it’s at Sketchbook/Examples/Sensors/Ping) and tweaked it to do what I wanted.
My sketch polls the PING))) sensor; if the distance reading that it returns is less than five inches, the sketch sets the digital pin connected to the sound module to HIGH, otherwise it sets it to LOW. And that’s it! I love how the Arduino enables you create simple things like this in such a short space of time. The sketch is here if you’re interested.
Here’s the final setup, showing the Freeduino (an Arduino clone) in the background:

And here’s a video of it in action:
Note:
If you use Linux and have version 4.3.0 of avr-gcc (which is the default in Ubuntu 8.10), then due to a bug discussed here you won’t get valid readings from the PING))) sensor (you’ll get enormous distance readings back, or at least I did). I upgraded to the Jaunty version and then it worked for me just fine.
HeartChuck
Sunday, 08 March 2009
I’ve been messing around with the Arduino lately. It’s a fun, low-barrier-of-entry, platform for hacking around with LEDs, servos and other fun stuff.
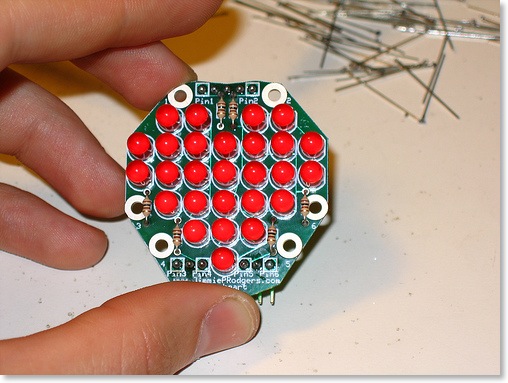
Recently I ordered the kit for an OpenHeart: an LED panel in the shape of a heart that uses charlieplexing to minimize the number of I/Os required to address the LEDs. The instructions were great and I picked up some tips to make my soldering better. The author made it very easy, even providing a flash-based programmer that lets you define your animation sequence and writes the code for you, so for animations all you need to do is cut-and-paste the code into the Arduino IDE and download it.
Fast forward a week or two and I watched episode 109 of Make TV, where John Park made a personal flight recorder using an Arduino and a Wii nunchuck.
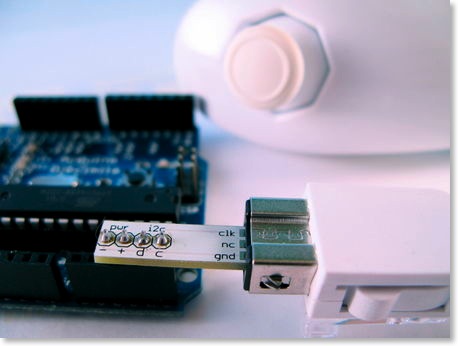
He used a Wiichuck to connect the nunchuck to the Arduino; it’s a really simple, but clever, board that saves you from having to hack off the custom connector, thereby rendering the nunchuck useless for future Wii boxing matches (and making you unpopular with your offspring in the process). The nunchuck has an I²C interface and the maker of the Wiichuck provides you with a wrapper to the Arduino’s Wire library that makes it really easy to get the accelerometer, button and joystick readings.
Tonight I decided to make the nunchuck control the openheart, which with all the hard work done by others didn’t take very long at all. The Arduino sketch is available for download if you’re interested.
Here’s a video of it in action:
Recently I ordered the kit for an OpenHeart: an LED panel in the shape of a heart that uses charlieplexing to minimize the number of I/Os required to address the LEDs. The instructions were great and I picked up some tips to make my soldering better. The author made it very easy, even providing a flash-based programmer that lets you define your animation sequence and writes the code for you, so for animations all you need to do is cut-and-paste the code into the Arduino IDE and download it.

Fast forward a week or two and I watched episode 109 of Make TV, where John Park made a personal flight recorder using an Arduino and a Wii nunchuck.

He used a Wiichuck to connect the nunchuck to the Arduino; it’s a really simple, but clever, board that saves you from having to hack off the custom connector, thereby rendering the nunchuck useless for future Wii boxing matches (and making you unpopular with your offspring in the process). The nunchuck has an I²C interface and the maker of the Wiichuck provides you with a wrapper to the Arduino’s Wire library that makes it really easy to get the accelerometer, button and joystick readings.
Tonight I decided to make the nunchuck control the openheart, which with all the hard work done by others didn’t take very long at all. The Arduino sketch is available for download if you’re interested.
Here’s a video of it in action:
Making Phunky
Wednesday, 25 February 2009
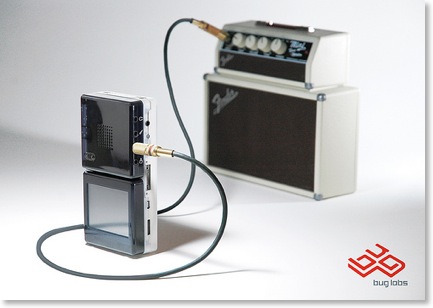
Bug Labs recently came out with their BUGsound module. I made a fun little application for it using the BUGmotion’s accelerometer stream to pick from a set of samples. The accelerometer is a 3-axis, so I assigned each axis 3 samples to choose from; the application then chooses one of those 3 samples based on that axis’ current reading and mixes the chosen samples for all the axes together. I picked the sample changeover point for each axis based on experimentation by moving the BUG around while printing out the accelerometer readings.
Figuring out how to get sample loops to mix on the fly at 44.1kHz was a little tricky, but it ended up not being much code (you can download it from http://buglabs.net/applications/Phunky if you’re interested).
Implementation
When the application starts it creates an instance of theSampleStream class, which extends InputStream, and starts playing it via IModuleAudioPlayer.play(); as far as IModuleAudioPlayer is aware, SampleStream is just a stream of data from a Wave file.The main loop in
PhunkyApplication.run() then runs forever, grabbing samples from the AccelerometerSampleStream as fast as it can, and passing the X, Y and Z values over to the SampleStream instance.Since
SampleStream extends InputStream, IModuleAudioPlayer is constantly grabbing sample data from it. SampleStream includes a faked Wave file RIFF header. It outputs that header first, and then outputs the mixed sample data from then on.SampleStream owns nine instances of the Sample class, which also extends InputStream. Each instance of Sample wraps a raw sample data file that comes with the application (more on them later).The nine
Sample instances are assigned three-to-an-axis. Thus whenever SampleStream is asked for data to be played (after the fake Wave header has been output), it looks at the X, Y and Z values it was last given by the main application loop, uses those values to choose a Sample instance for each axis, then reads a sample from each and mixes them together.Because the reading of accelerometer data is decoupled from the generation of the mixed sample data, there’s no concern about stuttering:
SampleStream will simply continue mixing the same 3 Sample streams together until it gets updated accelerometer data.That sounds like a lot of code, but it really isn’t: here’s the entire
SampleStream.read() method (apologies for the formatting; I need to change the width of this column I really do…):public int read() throws IOException {
int sample = 0;
if (tearDownRequested) {
System.out.println("Returning -1 to make audio stream appear done");
sample = -1;
}
else if (byteCount < riffHeader.length) {
// return the next byte of our canned header
sample = riffHeader[byteCount];
}
else {
// return the most recently computed sample based on the update() data
// pick which samples to combine to create out output sample
// based on the accelerometer values we have been given
if ((byteCount % 4) == 0) {
// we return sample data 8 bits at a time, but the samples
// themselves are 16 bits each, and in stereo so there are
// two samples that go together, so we mustn't switch streams
// in the middle of a sample or we'll be out of sync (returning
// half of one sample and half of the next). We can use the same
// byteCount as we used for the header because the header has an
// even number of bytes
xIn = chooseInput(x, xLowThreshold, xHighThreshold, x1, x2, x3);
yIn = chooseInput(y, yLowThreshold, yHighThreshold, y1, y2, y3);
zIn = chooseInput(z, zLowThreshold, zHighThreshold, z1, z2, z3);
}
try {
sample = xIn.read() + yIn.read() + zIn.read();
}
catch (IOException e) {
// ignore it as it shouldn't happen with our InputStreams anyway
}
}
++byteCount;
return sample;
}
Because
IModuleAudioPlayer.play() sees SampleStream as a simple InputStream, and SampleStream mixes together some InputStreams (the Sample instances) the code can be tweaked very easily to do different things: for example you could mix in another InputStream from the microphone, replace an axis with streams chosen by buttons, or any number of variations, without much of the code needing to be modified.Generating the Samples
At first I tried using simple samples that I generated using thetones command-line utility, but they weren’t all that exciting. So I played around with the excellent Hydrogen drum machine application instead. I made loops from existing samples in Hygrogen (claves, cowbell, floor tom, etc.) and exported them as raw 44.1kHz 16-bit stereo, little-endian, sample files. These are a lot more fun (at least for a few minutes) and sound pretty darn good through the BUGsound.More Cowbell!
Here’s a video showing Phunky in action: