iPod Remote
Monday, 07 September 2009
3/2/2010 UPDATE: See update post.
4/14/2010 UPDATE: See here if you have a v1.4 PodBreakout board.
UPDATE: Better photos up on Flickr.
I've been desperately short of Arduino play time in the last few months, but I did finally find time to finish my Arduino-based iPod remote (well, version 1.0 of it anyway). My remote has a single button that toggles between Play and Pause on the iPod. I wanted one like that for my car so I could easily pause my iPod Touch without having to: find it, unlock it; find the touch-screen pause button; and finally, pause it.
So how to go about this?
Well, the iPod dock connector actually exposes a serial connection to the iPod. You can see this on the pinout, the best online version of which I found on pinouts.ru. This serial connection can be used by docks, or in my case an Arduino, to interact with the iPod. The iPod speaks AAP on its serial port: the Apple Accessory Protocol. There are several modes in AAP that you can interact with an iPod over serial in, but Simple Remote (mode 0x02) is by far the easiest, as it has no responses to deal with. Simple Remote mode allows you to play and pause the iPod, change tracks, adjust the volume and so on. Since that covered my needs it's what I implemented first. (I've also implemented part of Advanced Remote (mode 0x04) as we'll briefly see later.)
With the pinout and protocol documentation in hand I ordered a couple of cheap iPod charging cables to hack on. However, when they arrived I realized that my soldering skillz were nowhere near good enough to make the connections I was going to need. Luckily I am not the first person to have this problem, and SparkFun has the solution: the PodGizmo breakout board:
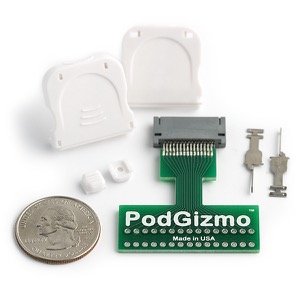
The PodGizmo has connections to all the pins on the dock connector and gives you through-holes to solder things onto: perfect!
I proceeded to hook up wires to the serial I/O pins (12 and 13), serial ground (11) and to pin 21: the rather curious-sounding "Accesory Indicator / Serial Enable" pin. The level of resistance between this pin and ground apparently tells the iPod what kind of accessory it is connected to. Since I wanted to use the serial interface, I went with a 500kOhm resistor, to select the "related to serial communication / used to enable serial communications Used in Dension Ice Link Plus car interface" mode.
With my connections made, I was about to hook it up to my Arduino, but then I remembered that the serial output of the Arduino is 5V. I wasn't sure what the iPod wanted but I guessed it probably only wanted 3.3V. I didn't know what to do, so I googled around for a bit looking at various level-shifting solutions. Some you could make from a few components but I was concerned they wouldn't be able to switch fast enough to get a good serial signal. Luckily, during my googling I came across another SparkFun gem: the BOB-08745 Logic Level Converter.
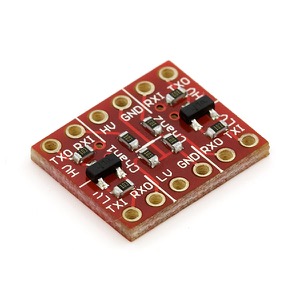
This little guy lets you talk serial (or I2C, SPI, etc) at one voltage on one side and another voltage on the other side. Again: perfect!
So with the level converter added to the mix, I was ready to hook it up to the Arduino.
Of course, hooking up wasn't going to do much without some code to talk Apple Accessory Protocol, so that was the next task. I wrote an Arduino library for the parts of the Apple Accessory Protocol that I was going to need, and a bit more besides. I posted it on github in case anyone else wanted to use it. It comes with a couple of example sketches: a play/pause one using Simple Remote mode (wonder where I got that idea from); and one for Advanced Remote mode that pulls back information for the track that the iPod is currently playing. The latter could form the basis of an Arduino-based dock that showed track information on an LCD display, for example.
Here's the example Simple Remote sketch. I'm using almost exactly this for my remote, the only difference being that I'm using an active-low on my switch with the Arduino's internal pull-up to avoid having an external resistor for the switch:
During development I used an Arduino Mega so that I could have a real serial port for the iPod and a real one for debugging messages. I probably could just have used the SoftwareSerial library with a regular Arduino for debugging, but since I had the Mega around, I used it. My library defaults to having debugging messages disabled, but you can configure it in your
Once I had it working to my liking I transferred the sketch over to an Arduino Nano, since it would fit in an Altoids tin (of course). This is what it looked like at this point:
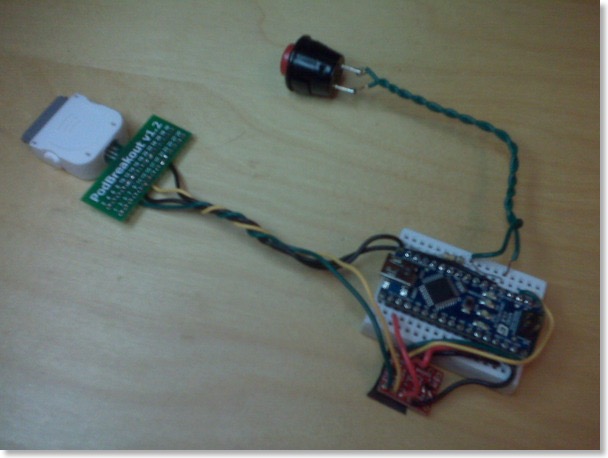
You can see I'm just using a simple push button for the play/pause action. The Nano is sitting on a little breadboard and you can just see the resistor I have connected to pin 21. I probably should have just put the resistor on the PodGizmo breakout board, but I didn't.
Next came testing it with my iPod Touch:
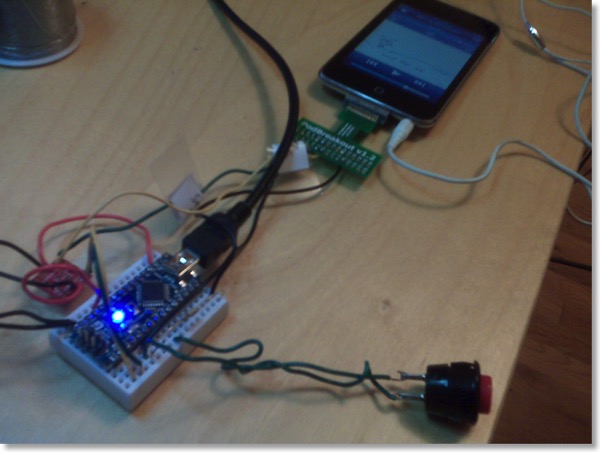
Everything checked out, so next I switched out the little button for a REALLY BIG BUTTON:
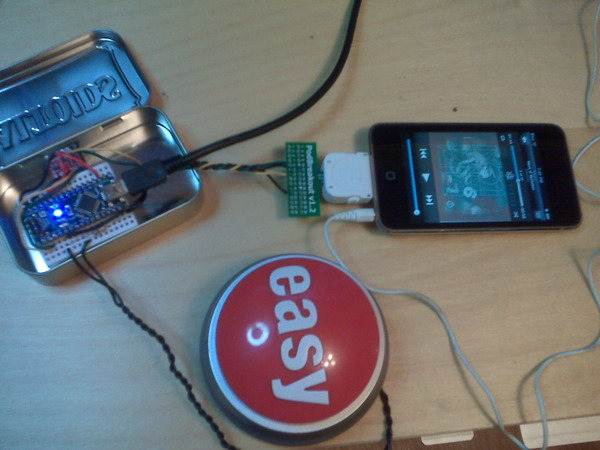
As you can see it's an Easy Button from Staples; I just took out the Easy Button's batteries, soldered wires to either side of its switch, and routed them out through the hole conveniently left by the battery lid. The Nano is sitting on an Altoids tin at this stage, but it's not yet in the tin. That came next, thanks to Mr Dremel:
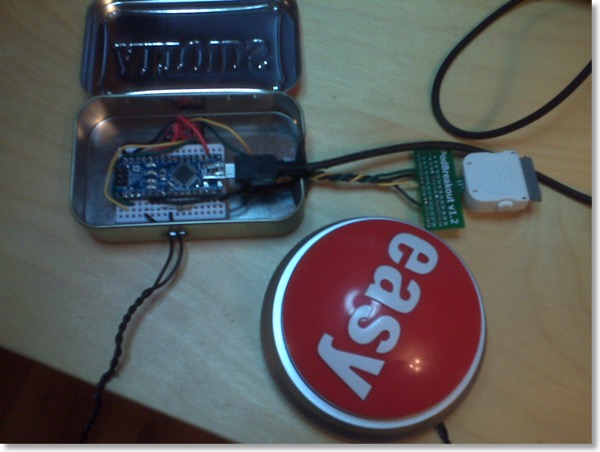
I took it out to the car, hooked up the Nano's USB cable to my USB car adaptor (similar to this one on Amazon, but you can get them lots of places), and tried it out. It worked pretty well, but there was one problem: I was still using a cable to connect the headphone socket on the iPod to the line-in jack on my car. The audio wouldn't go out the headphone socket unless I plugged the dock cable in first and then the headphone cable. As you've probably realized by this point, it was completely stupid of me to still be using a headphone cable: the dock connector has connections for line out! Having caught up with my smarter readers, I took the remote into the lab at work and add hooked up the line-out cable. This gives me true line out instead of the volume-adjusted headphone output, saves wear and tear on the headphone socket on my iPod, and avoids the what-to-connect-first problem, as there's only one thing to connect.
So how does it work? It works great, thanks! The only real quirk I've noticed is that when I first connect it, my 2G iPod Touch will play audio out of its internal 'speaker' for a couple of seconds before realizing that it's connected to the dock and switching over. It even pauses the iPod when I turn off the car, presumably because the iPod sees the dock go away when the Nano loses power.
No doubt someone will point out that the Nano is a gazillion times overpowered to do a couple of serial I/O sequences, and they'd be right. But: I already had the Nano anyway; and I plan on expanding the remote soon (dash-mounted, arduinix-powered, nixie tube track status action anybody?).
4/14/2010 UPDATE: See here if you have a v1.4 PodBreakout board.
UPDATE: Better photos up on Flickr.
I've been desperately short of Arduino play time in the last few months, but I did finally find time to finish my Arduino-based iPod remote (well, version 1.0 of it anyway). My remote has a single button that toggles between Play and Pause on the iPod. I wanted one like that for my car so I could easily pause my iPod Touch without having to: find it, unlock it; find the touch-screen pause button; and finally, pause it.
So how to go about this?
Well, the iPod dock connector actually exposes a serial connection to the iPod. You can see this on the pinout, the best online version of which I found on pinouts.ru. This serial connection can be used by docks, or in my case an Arduino, to interact with the iPod. The iPod speaks AAP on its serial port: the Apple Accessory Protocol. There are several modes in AAP that you can interact with an iPod over serial in, but Simple Remote (mode 0x02) is by far the easiest, as it has no responses to deal with. Simple Remote mode allows you to play and pause the iPod, change tracks, adjust the volume and so on. Since that covered my needs it's what I implemented first. (I've also implemented part of Advanced Remote (mode 0x04) as we'll briefly see later.)
With the pinout and protocol documentation in hand I ordered a couple of cheap iPod charging cables to hack on. However, when they arrived I realized that my soldering skillz were nowhere near good enough to make the connections I was going to need. Luckily I am not the first person to have this problem, and SparkFun has the solution: the PodGizmo breakout board:

The PodGizmo has connections to all the pins on the dock connector and gives you through-holes to solder things onto: perfect!
I proceeded to hook up wires to the serial I/O pins (12 and 13), serial ground (11) and to pin 21: the rather curious-sounding "Accesory Indicator / Serial Enable" pin. The level of resistance between this pin and ground apparently tells the iPod what kind of accessory it is connected to. Since I wanted to use the serial interface, I went with a 500kOhm resistor, to select the "related to serial communication / used to enable serial communications Used in Dension Ice Link Plus car interface" mode.
With my connections made, I was about to hook it up to my Arduino, but then I remembered that the serial output of the Arduino is 5V. I wasn't sure what the iPod wanted but I guessed it probably only wanted 3.3V. I didn't know what to do, so I googled around for a bit looking at various level-shifting solutions. Some you could make from a few components but I was concerned they wouldn't be able to switch fast enough to get a good serial signal. Luckily, during my googling I came across another SparkFun gem: the BOB-08745 Logic Level Converter.

This little guy lets you talk serial (or I2C, SPI, etc) at one voltage on one side and another voltage on the other side. Again: perfect!
So with the level converter added to the mix, I was ready to hook it up to the Arduino.
Of course, hooking up wasn't going to do much without some code to talk Apple Accessory Protocol, so that was the next task. I wrote an Arduino library for the parts of the Apple Accessory Protocol that I was going to need, and a bit more besides. I posted it on github in case anyone else wanted to use it. It comes with a couple of example sketches: a play/pause one using Simple Remote mode (wonder where I got that idea from); and one for Advanced Remote mode that pulls back information for the track that the iPod is currently playing. The latter could form the basis of an Arduino-based dock that showed track information on an LCD display, for example.
Here's the example Simple Remote sketch. I'm using almost exactly this for my remote, the only difference being that I'm using an active-low on my switch with the Arduino's internal pull-up to avoid having an external resistor for the switch:
During development I used an Arduino Mega so that I could have a real serial port for the iPod and a real one for debugging messages. I probably could just have used the SoftwareSerial library with a regular Arduino for debugging, but since I had the Mega around, I used it. My library defaults to having debugging messages disabled, but you can configure it in your
setup() method to route those messages to any serial port you like.Once I had it working to my liking I transferred the sketch over to an Arduino Nano, since it would fit in an Altoids tin (of course). This is what it looked like at this point:

You can see I'm just using a simple push button for the play/pause action. The Nano is sitting on a little breadboard and you can just see the resistor I have connected to pin 21. I probably should have just put the resistor on the PodGizmo breakout board, but I didn't.
Next came testing it with my iPod Touch:

Everything checked out, so next I switched out the little button for a REALLY BIG BUTTON:

As you can see it's an Easy Button from Staples; I just took out the Easy Button's batteries, soldered wires to either side of its switch, and routed them out through the hole conveniently left by the battery lid. The Nano is sitting on an Altoids tin at this stage, but it's not yet in the tin. That came next, thanks to Mr Dremel:

I took it out to the car, hooked up the Nano's USB cable to my USB car adaptor (similar to this one on Amazon, but you can get them lots of places), and tried it out. It worked pretty well, but there was one problem: I was still using a cable to connect the headphone socket on the iPod to the line-in jack on my car. The audio wouldn't go out the headphone socket unless I plugged the dock cable in first and then the headphone cable. As you've probably realized by this point, it was completely stupid of me to still be using a headphone cable: the dock connector has connections for line out! Having caught up with my smarter readers, I took the remote into the lab at work and add hooked up the line-out cable. This gives me true line out instead of the volume-adjusted headphone output, saves wear and tear on the headphone socket on my iPod, and avoids the what-to-connect-first problem, as there's only one thing to connect.
So how does it work? It works great, thanks! The only real quirk I've noticed is that when I first connect it, my 2G iPod Touch will play audio out of its internal 'speaker' for a couple of seconds before realizing that it's connected to the dock and switching over. It even pauses the iPod when I turn off the car, presumably because the iPod sees the dock go away when the Nano loses power.
No doubt someone will point out that the Nano is a gazillion times overpowered to do a couple of serial I/O sequences, and they'd be right. But: I already had the Nano anyway; and I plan on expanding the remote soon (dash-mounted, arduinix-powered, nixie tube track status action anybody?).