Accessing the OS X Services Menu programmatically
The book is well written and well organized. I’m an experienced non-Apple programmer, but this was my first foray into Objective C and Cocoa, and my first time using Xcode. As a C++ guy, I can’t always bring myself to like the way Objective C goes about things, but there is a certain elegance in its simplicity. I’m also impressed with Xcode and with Cocoa. I’ve never done much in the way of visual programming, but I am obliged to use Visual Studio for work, and on occasion (I don’t know MFC, really, I don’t) I’ve done some minor GUI stuff with it and always found it most distasteful. Cocoa and Xcode just blow it away: proper separation of model, view and controller!
Falling back to my non-visual roots, I thought it would be interesting to see what it would take to make a command-line utility that would open up a list of files in Aquamacs Emacs (like mate does for TextMate). (Aquamacs Emacs will accept multiple files via open -a Aquamacs\ Emacs, and I have an alias set up to do that, so I don’t actually need this utility, but it fit the bill for a good, small, learning task.)
I struggled a bit with path manipulation - there has to be a better way to convert from relative to absolute than I came up with - and I only made it open one file, although it would be trivial to add a loop (multiple service calls - it won’t take multiple files in one) to cope with that. I also had to do a bit of googling to figure out the incantantion to get my file onto the pasteboard properly.
So, it’s certainly sub-optimal, but it does at least work. Here’s the code. It just takes the (first, absent the loop) file name from the command line arguments, places it on the appropriate pasteboard, then invokes Services/Aquamacs Emacs/Open Selected File.
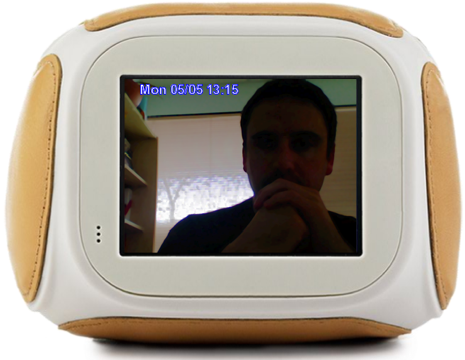
From iSight to Chumby with love
Then the other day I was perusing the available widgets on chumby.com and came across, in the web-cams sections, a widget that will display and poll an arbitrary image given a URL. I thought it might be fun to make a self-spy cam, as it were, and have my MacBook upload the iSight camera image every few minutes while I was work. Then my ugly mug would show up on my wife's Chumby, between Chuck Norris Facts and the San Diego Zoo's panda cam.
My first thought was to use Automator for this task. It has iSight support, and Transmit has Automator support, so it should have been pretty easy to take the picture and upload it to one of my websites. But Automator apparently insists on doing the 3-2-1-beep/flash means of taking a picture, as in Photo Booth. Putting up with that every few minutes would be irritating to say the least. So I did a quick google and came across
isightcapture. isightcapture is a command-line application that captures an image from your iSight camera and saves it to file. It was a simple matter to put together a shell script to capture the image and then use scp to upload it to my web host (I already had SSH public key authentication configured on the host, so I didn't need to worry about having to enter a password).This is pretty good; we have our image automatically taken and uploaded, ending up with something like this:

Tweaking the Image
So far, so good; but there is room for improvement: 1) at 640x480 it's twice as big as the Chumby wants; 2) how would my wife know when the picture was taken?
isightcapture can resize the picture, but let's pretend it can't. My wife likely doesn't care when the picture was taken, but let's pretend that she does. Humour me here, okay?Is there something out there that could solve both of these problems? Something free? Why yes. Enter ImageMagick. ImageMagick is an excellent full-featured image manipulation toolkit; indeed, you will see it prominently featured in the Acknowledgements section of Pixelmator, for example. It also is command-line driven, which is perfect for what I wanted to do here: resize the image and annotate it with a timestamp prior to uploading it. So, I built ImageMagick via via MacPorts and added a call to its
convert tool to my script with the following options:+contrast +contrast +contrast -noise 3 -resize 320 -stroke blue -fill white -pointsize 18 -font Arial-Bold -annotate +20+20 "$(date '+%a %m/%d %H:%M')"That's a bit of a mouthful, so let's break it down:
+contrast +contrast +contrast bumps up the contrast a little, as my iSight happens to face a window in my office;-noise 3 denoises the image, which looks pretty pixelly in the poor light of my office;-resize 320 resizes the image proportionally to a width of 320 pixels;-stroke blue -fill white sets the text to be white with a blue outline;-pointsize 18 -font Arial-Bold sets the text to be 18pt Arial Bold;+20+20 sets the text origin at 20 pixels in and down (respectively) from the top left-hand corner;"$(date '+%a %m/%d %H:%M')" runs the command-line date program to get the timestamp in the format that I want: Sun 05/04 23:28Running
convert on our raw image with those options gives us:
Great! We now have an automatically-annotated image.
Automation
Now all that remains is to automate the process of running the shell script every few minutes, so that the image the Chumby will download from the website will actually change.
You could use
cron or launchd for this. Unfortunately, Apple recently changed things so that isightcapture wouldn't work from background daemons, likely as part of some security update. Fair enough, I suppose. To get round this we must introduce another quirk: a little AppleScript to make our script execute in the user's 'face', so that it can access the camera. To do this open up Script Editor and create a script with a line similar to the following:do shell script "/Users/dave/bin/grabme"
Save your script out as an application. In my case I made it
grabme.app.Now we can set up cron to run our AppleScript for us, by adding a line to our
crontab:0,15,30,45 10-17 * * 1-5 open /Users/dave/bin/grabme.appThis example will take a picture every 15 minutes between 10am and 5:45pm, Monday through Friday.
On the Chumby
So now we have our image automatically captured and uploaded when we want it to. The next step is to configure the Chumby to display the image. In the widget selector on chumby.com, go to Webcams and then choose Load Image From URL. Put the widget in the channel you of your choice and then customize it with the URL your image is available at. Be sure to select the prevent Caching radio button.
After all that you should be "rewarded" with:
Larry Lessig using Keynote
Cabel Sasser's talk at C4
Here's the video from the talk; highly recommended.
Can't do web design for toffee
I haven't posted in a while because I have been playing with blogging tools. I currently use RapidWeaver, but it bugs me in a Microsoft Word sort of way; well okay, it's nowhere near that annoying, but still an annoyance nonetheless. It just does things the way it wants to, rather than the way I want it to. It's a bit for flexible than iWeb, granted, but its themes are not nearly as pretty, either.
To satisfy my curiosity about what else might work, I set up a couple of Wordpress blogs (one canned, one not), and a Movable Type blog (way not canned) on my webserver. I then downloaded the much-acclaimed MarsEdit 2, a blog publishing application for the Mac. At first it seemed surprisingly bare-bones (although it's not from barebones), but that actually isn't a bad thing; I suppose I just expected it to be flashier based on what I had heard about it. It has an intentionally non-WYSIWG editor, and the developer in me likes that; needs that even. Besides, Gruber uses it, so it has to be good, right? So, I played around with it some more, and I started to really appreciate being able to set up a post the way I wanted it set up.
But part of me still wanted more control. The little developer in my head, who forgets that I can't do web design for toffee, was saying "let's do this using hand-crafted-with-love XHTML and CSS". I got as far as purchasing cssedit, a really great CSS utility from macrabbit software. I love how you can use it to override the style sheets on a site and tweak them live: really neat stuff. But as I said, I can't do web design for toffee, or any other highly-sugared sweet for that matter (and if you know me, you know how much I like highly-sugared sweets, and hence you know how bad I must be at web design). So, while I have used it to tweak RapidWeaver's themes a little, I haven't really gotten a lot of use from it.
I considered looking at Panic's Coda again. Coda is billed on Panic's site as "one window web development"; it includes a text editor, CSS editor and a cut-down version of Transmit - Panic's excellent FTP/SFTP/etc tool (which I use often). I played with Coda back when it came out, but I didn't care to learn another text editor (it uses SubEthaEdit); and, as I mentioned before, I can't do web design for toffee, so creating the CSS from scratch likely wasn't going to work out well for any passing viewers' eye balls or sensibilities.
So what to do? I think I could get either Wordpress or Movable Type to look the way I want, or as close to it as my can't-do-web-design-for-toffee skillz will allow (thank you, cssedit). I would then have to figure out how to get all the old posts out of Rapid Weaver. It stores your site's data in a single binary project file, so there doesn't appear to be an easy way to extract the individual posts. I could try and scrape the appropriate tags out of the rendered HTML but that seems kludgy at best. Maybe if I create a RapidWeaver them that has next to no formatting and publish that, the scraping might be easier?
As I continue to ponder, I will stick with RapidWeaver. Maybe version 4 will make me okay with staying the course?
If Apple gives you lemons, make lemonade
So, Apple gave me a lemon upgrade; could I make some lemonade here?
I have a USB 2.0 PCI card in the PowerMac, but even back on Tiger, if I put it to sleep with a power-drawing device attached to that card, it wouldn't sleep properly and I'd have to power cycle it to get it back. So, I had gotten into the habit of keeping the USB cable for my SD card reader unplugged from the reader, but plugged into the PCI card: a pain, but better than trying to copy 7MP images over USB 1.1.
For backups, I used to have the computer wake itself up at 3am. I had SuperDuper scheduled to run at 3:05 and then put the computer back to sleep.
Since sleep wasn't going to work any more, I changed my backup schedule so that SuperDuper would run at 12:30am and then power the computer off. I then changed the scheduled wake up to be at 7am, a few minutes before my wife would get up and check to see whether or not our daughter's school was on a 2-hour delay.
The wakeup feature is accessible via the Schedule... button on the Energy Saver panel in System Preferences:
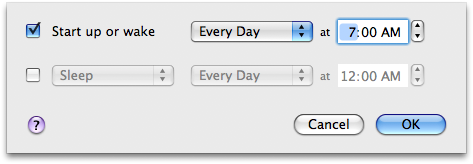
This did the trick nicely, because the scheduled wake up works even if the computer is off. So now, while I can't enjoy the power-saving benefits of sleep, I can at least keep my backup running out-of-hours and still avoid having to leave the PowerMac running 24x7.
I think that qualifies as lemonade, even if it's only Country Time and not the real stuff.
Update:
There is another discussion going on on Apple's forums about a possible fix for this sleep issue. Basically, it involves rolling back the drivers in the graphics update in a somewhat kludgy fashion. I think I will just wait until Apple releases a real fix though.
New Drive: Update
So what's left now:
- 56GB, which means I've gobbled up 80GB with the aforementioned stuffed, but still a goodly amount left for more cruft - huzzah.
On the speed front, it seems to be peppier, but I could be imagining that since it never felt all that slow anyway, even with the 5400RPM Toshiba in it. I also don't notice any more noise or heat. I haven't yet run off-grid long enough to see if battery life has been reduced.
So far though, I couldn't be happier with the upgrade. I now have all of the movie files from our digital camera on the MacBook, so I can put them together in the new iMovie; I couldn't do that on the PowerMac as it's too old for the new iMovie to install on. It's also nice to have all of our music with me, since I sync my Nano to the MacBook (mostly just for podcasts for my commute, but occasionally I'll listen to some tunes).
You don't know the power of the darkside MacBook
No big deal, right? Well, the interesting thing is that only the MacBook was a real machine: the XP and Fedora machines were actually virtual, and running on the MacBook courtesy of VMWare Fusion. It hit me just how much computing power we have at our disposal these days: a 15-month old consumer-grade laptop running 2 virtual machines plus its own applications, all simultaneously and without any perceptible slowdown: this is not even a MacBook Pro!
Here's what my Spaces-plus-Expose view shows me (Spaces is Leopard's multiple-desktop implementation, and Expose is OS X's way of showing you all the active windows on your desktop, so you can pick one to switch to; in true Apple-cool fashion, if you bring up the Spaces view and then ask for the Expose view it shows you the Expose view for each one of your desktops simultaneously):
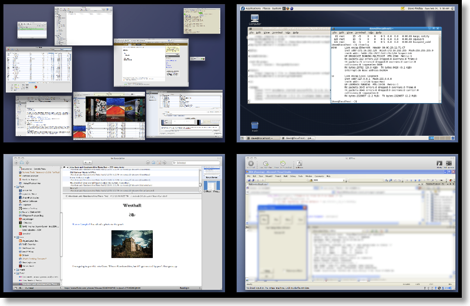
In the top-left we have space number 1, where: I have started to write this post in RapidWeaver; iTunes is running (that's Californication from Red Hot Chili Peppers at the front, if you were wondering); Transmission is seeding the Fedora Core 8 DVD ISO; OmniFocus, iChat, Terminal, Mail and Safari are all doing their thing; and Activity Monitor is letting me know how this is all going. It's not shown, (eggs, chickens and what not) but I had Pixelmator going as well, long enough to blur a couple parts of the screenshot to protect the innocent.
In the top-right, the Fedora 8 VMWare Fusion virtual machine is running a Java server application and its database backend.
In the bottom-left, NetNewsWire is keeping me up-to-date.
Finally, in the bottom-right, the XP VMWare Fusion virtual machine is running Visual Studio 2005 debugging an MFC application; by the way, I don't know MFC.
Here's a close up of Activity Monitor, with the memory tab active, sorted by descending order of use of real memory:
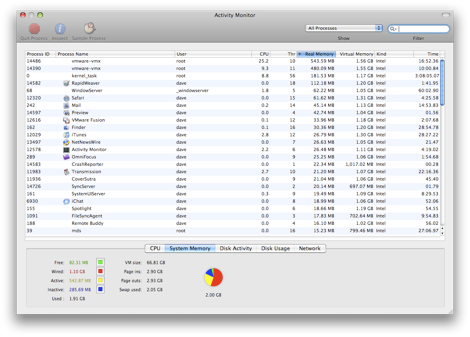
The big hitters, unsurprisingly, are the two virtual machines, weighing in at around 500MB each. They were both configured with 512MB of RAM, so that makes sense. Next we have the kernel, close followed by RapidWeaver (the application that I use to write this). From there you're down in the weeds of measly 60MB chunks of RAM here and 40MB chunks of RAM there. From the stats at the bottom, you can see that there's 369MB (sum of free and inactive) of RAM free (see this Apple article for an explanation of the different categories of memory).
And just think, if you buy a MacBook now you can fit 4GB in it and the integrated graphics are faster than mine. How many VMs can you run?
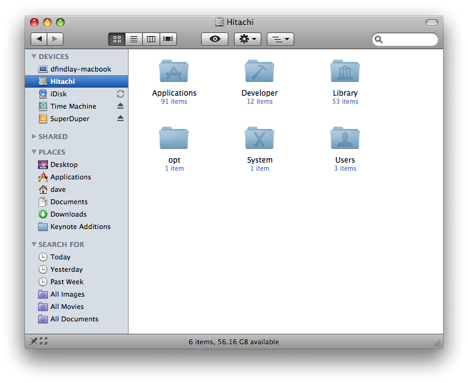
New Hard Drive
I replaced the hard drive in my MacBook today with a new 200GB, 7200RPM, Hitachi Travelstar™ 7K200. I had read several reviews, all favourable, and supposedly it doesn't use much more power, or get much warmer, than the stock Toshiba 80GB. I use VMWare Fusion to run an XP VM and an OpenSolaris VM, so the 74GB on the stock drive wasn't cutting it. I ordered the new one from MacSales and picked up a Newer Technology USB 2.0 Universal Drive Adapter at the same time; it lets you hook up just about any bare drive to a PC or Mac via USB 2.0.
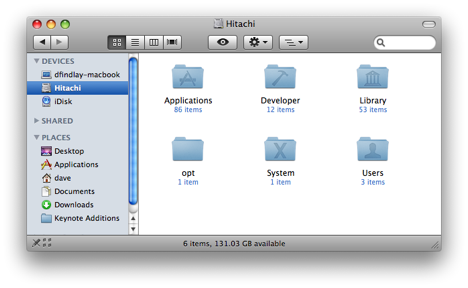
I hooked up the new Hitachi via the adapter and used Disk Utility to create a single 185.99GB partition. I set it up with 'GUID Partition Table' as the Partition Map Scheme, since that's required on Intel Macs for boot volumes. I then had SuperDuper make a bootable image of my existing hard drive, which took a couple of hours.
Once I had that, I rebooted while holding down Option so that it would let me choose a boot volume on boot. The Hitachi showed up - a good sign - and I selected it. It came up, I logged in, and everything looked good, so I shut it back down and proceeded to swap the drive out. Fortunately Apple makes this about as painless as it could possibly be; providing you follow common-sense precautions for ESD you shouldn't have any trouble. I printed out the instructions at MacInstruct and headed over to our hardware lab at work, since it has copious amounts of static-mat-covered workbenches and the Torx T8 you need to get the shield off the old drive. 10 minutes later I was up and running on the new drive.
I should have named the new drive 'Macintosh HD' to match the old one, but I didn't and both Time Machine and Spotlight got a bit excited when I booted up. But my old Time Machine drive isn't going to be big enough for long, and I don't need any of the history that's on it anyway, so this wasn't a big deal for me.
I'll report back on whether the RPM bump affects battery life and performance.
SuperDuper! for Leopard is here
SuperDuper for Leopard almost here
I'm looking forward to the update. SuperDuper! has always been my backup solution for OS X and I've been feeling itchy running on Leopard without it; I've got Time Machine running, but you have to restore from a boot CD with that if things go awry - yuk. I'm particularly nervous for my PowerMac, since it's boot volume is on the same 3+ year-old 120GB drive in it that it came with. I really ought to pick up a new ATA drive for it before it goes belly up.
iPhoto 7 first impressions
Events
When the main window appeared I was presented with a surprisingly small number of the much-touted Events. On closer inspection it seems that Events, at least from an upgrade, are pretty-much synonymous with the old Rolls, albeit given equal billing with Photos in the sidebar and a very pretty facelift. This was a little disappointing. I had understood that events were created based on their date taken, not the date they were imported into iPhoto (who cares about that date). I often batch import several days worth of pictures. Of course iPhoto will let you split an event, but the whole point of Steve's pitch was that you didn't have to do it manually. What made this more disappointing was the 3000 or so pictures I imported when I switched; these all showed up as 1 event spanning multiple years.
Since I didn't feel like splitting that mega-event up, I decided to create events from the albums I had created. This proved to be a little clumsy, but perhaps I just didn't find the simplest way to do it.
For each album, I:
- Selected the album in the side bar.
- Selected all the photos.
- Picked Create Event... from the Events menu.
- Accepted the warning about photos only being in one event at a time. (which can silence after the first time)
This created an event. I could tell because the count after "Events" in the sidebar went up by one, but it left me with my pictures selected back in the album. I then had to:
- Click Events in the sidebar.
- Find the new Event (which fortunately was selected).
- Edit the title of the new event and pick my key photo.
Moving forward this shouldn't be so tedious, but had iPhoto created events based on the date each photo was shot, I think it wouldn't have giving me a better starting point.
Tags
I use the excellent FlickrExporter to public my photos to my Flickr account (Fraser has updated it to use the new official Apple API in iPhoto 7 by the way). One of the many nice things about FlickrExporter is that it turns iPhoto keywords into Flickr tags. However, getting keywords added to photos in iPhoto 6 was a pretty tortuous experience; or it was until I discovered Ken Ferry's Keyword Assistant. With Keyword Assitant I just wouldn't have been able to contemplate keeping my tagging up-to-date. A few days ago, Ken posted on the Keyword Assistant blog:
And boy was he right. If you enable viewing of keywords in iPhoto 7, you can simply click in the space where the keywords are (or would be if there aren't any yet) and start typing. And I mean right under the photo in the main Photos view, not in the information popup in the sidebar. The keywords tab-complete, and you can use comma to accept one and start adding another, just like Mail does with contacts when you're addressing an email. Same goes for the photo's title: click on it and start typing.I'm happy to report that I won't be updating Keyword Assistant for iLife '08 for one reason: The native keyword interface in iPhoto 7 is good enough that Keyword Assistant is unnecessary! You can enter keywords by typing, the keywords autocomplete, use of a non-existent keyword will implicitly create it, and you can assign keywords for an entire album without using the mouse.
Tab takes you to the next photo's title; tab again and you're at that photo's keywords. You can create new keywords inline and it doesn't say boo. Very very nice.
iPhoto Library a package
The
iPhoto Library folder under /Users/username/Photos is now a package (so you have to right- or Ctrl-click on it and select Show Package Contents to get to your photos. iPhoto never really did like you poking about under its hood; I guess Apple want to make that even clearer with version 7.Web Gallery
Now that .Mac accounts have been bumped to a health 10GB, I decided to give the new Web Gallery feature a go. Creating a Web Gallery album was straightforward and they look nice in the browser. I did noticed that in Firefox, the slideshow option's fade doesn't work: each picture flashes off and on alarmingly during the transition to the next one. In Safari 3 Beta 3.0.3 when the new picture fades it, the old pictures shows once then disappears. I didn't noticed either of these quirks with Safari 2.
Minor browser quirks aside, the new Web Gallery looks great. The drag-to-see-the-pictures-inside feature of events in iPhoto also works in the Web Gallery, and the thumbnail size slider too is straight out of iPhoto. Apple did a nice job here. I expect I will stick to using Flickr, but for others who don't feel the need to post every single photo of their kid for others to 'enjoy', Web Gallery looks like it will be just the ticket.
.Mac Storage Increase
Maybe I will be able to do something with it other than syncing my Keychains and Address Book now. I use Flickr for sharing my photographs, but the new iLife '08 Web Gallery might be useful for sharing movies (I've never had much luck with YouTube: it always seems to end up mangling my videos too much).