a man, a plan, a cake: nirvana
May 2008
From iSight to Chumby with love
Sunday, 04 May 2008
Since my wife got her Chumby, I've been reading up on ActionScript. It's not been a terribly amusing process, and I haven't had much time to devote to it, so I haven't gotten any further than a prototype recipe chumbifier widget so far.
Then the other day I was perusing the available widgets on chumby.com and came across, in the web-cams sections, a widget that will display and poll an arbitrary image given a URL. I thought it might be fun to make a self-spy cam, as it were, and have my MacBook upload the iSight camera image every few minutes while I was work. Then my ugly mug would show up on my wife's Chumby, between Chuck Norris Facts and the San Diego Zoo's panda cam.
My first thought was to use Automator for this task. It has iSight support, and Transmit has Automator support, so it should have been pretty easy to take the picture and upload it to one of my websites. But Automator apparently insists on doing the 3-2-1-beep/flash means of taking a picture, as in Photo Booth. Putting up with that every few minutes would be irritating to say the least. So I did a quick google and came across
This is pretty good; we have our image automatically taken and uploaded, ending up with something like this:

Tweaking the Image
So far, so good; but there is room for improvement: 1) at 640x480 it's twice as big as the Chumby wants; 2) how would my wife know when the picture was taken?
Is there something out there that could solve both of these problems? Something free? Why yes. Enter ImageMagick. ImageMagick is an excellent full-featured image manipulation toolkit; indeed, you will see it prominently featured in the Acknowledgements section of Pixelmator, for example. It also is command-line driven, which is perfect for what I wanted to do here: resize the image and annotate it with a timestamp prior to uploading it. So, I built ImageMagick via via MacPorts and added a call to its
That's a bit of a mouthful, so let's break it down:
Running

Great! We now have an automatically-annotated image.
Automation
Now all that remains is to automate the process of running the shell script every few minutes, so that the image the Chumby will download from the website will actually change.
You could use
do shell script "/Users/dave/bin/grabme"
Save your script out as an application. In my case I made it
Now we can set up cron to run our AppleScript for us, by adding a line to our
This example will take a picture every 15 minutes between 10am and 5:45pm, Monday through Friday.
On the Chumby
So now we have our image automatically captured and uploaded when we want it to. The next step is to configure the Chumby to display the image. In the widget selector on chumby.com, go to Webcams and then choose Load Image From URL. Put the widget in the channel you of your choice and then customize it with the URL your image is available at. Be sure to select the prevent Caching radio button.
After all that you should be "rewarded" with:
Then the other day I was perusing the available widgets on chumby.com and came across, in the web-cams sections, a widget that will display and poll an arbitrary image given a URL. I thought it might be fun to make a self-spy cam, as it were, and have my MacBook upload the iSight camera image every few minutes while I was work. Then my ugly mug would show up on my wife's Chumby, between Chuck Norris Facts and the San Diego Zoo's panda cam.
My first thought was to use Automator for this task. It has iSight support, and Transmit has Automator support, so it should have been pretty easy to take the picture and upload it to one of my websites. But Automator apparently insists on doing the 3-2-1-beep/flash means of taking a picture, as in Photo Booth. Putting up with that every few minutes would be irritating to say the least. So I did a quick google and came across
isightcapture. isightcapture is a command-line application that captures an image from your iSight camera and saves it to file. It was a simple matter to put together a shell script to capture the image and then use scp to upload it to my web host (I already had SSH public key authentication configured on the host, so I didn't need to worry about having to enter a password).This is pretty good; we have our image automatically taken and uploaded, ending up with something like this:
Tweaking the Image
So far, so good; but there is room for improvement: 1) at 640x480 it's twice as big as the Chumby wants; 2) how would my wife know when the picture was taken?
isightcapture can resize the picture, but let's pretend it can't. My wife likely doesn't care when the picture was taken, but let's pretend that she does. Humour me here, okay?Is there something out there that could solve both of these problems? Something free? Why yes. Enter ImageMagick. ImageMagick is an excellent full-featured image manipulation toolkit; indeed, you will see it prominently featured in the Acknowledgements section of Pixelmator, for example. It also is command-line driven, which is perfect for what I wanted to do here: resize the image and annotate it with a timestamp prior to uploading it. So, I built ImageMagick via via MacPorts and added a call to its
convert tool to my script with the following options:+contrast +contrast +contrast -noise 3 -resize 320 -stroke blue -fill white -pointsize 18 -font Arial-Bold -annotate +20+20 "$(date '+%a %m/%d %H:%M')"That's a bit of a mouthful, so let's break it down:
+contrast +contrast +contrast bumps up the contrast a little, as my iSight happens to face a window in my office;-noise 3 denoises the image, which looks pretty pixelly in the poor light of my office;-resize 320 resizes the image proportionally to a width of 320 pixels;-stroke blue -fill white sets the text to be white with a blue outline;-pointsize 18 -font Arial-Bold sets the text to be 18pt Arial Bold;+20+20 sets the text origin at 20 pixels in and down (respectively) from the top left-hand corner;"$(date '+%a %m/%d %H:%M')" runs the command-line date program to get the timestamp in the format that I want: Sun 05/04 23:28Running
convert on our raw image with those options gives us:Great! We now have an automatically-annotated image.
Automation
Now all that remains is to automate the process of running the shell script every few minutes, so that the image the Chumby will download from the website will actually change.
You could use
cron or launchd for this. Unfortunately, Apple recently changed things so that isightcapture wouldn't work from background daemons, likely as part of some security update. Fair enough, I suppose. To get round this we must introduce another quirk: a little AppleScript to make our script execute in the user's 'face', so that it can access the camera. To do this open up Script Editor and create a script with a line similar to the following:do shell script "/Users/dave/bin/grabme"
Save your script out as an application. In my case I made it
grabme.app.Now we can set up cron to run our AppleScript for us, by adding a line to our
crontab:0,15,30,45 10-17 * * 1-5 open /Users/dave/bin/grabme.appThis example will take a picture every 15 minutes between 10am and 5:45pm, Monday through Friday.
On the Chumby
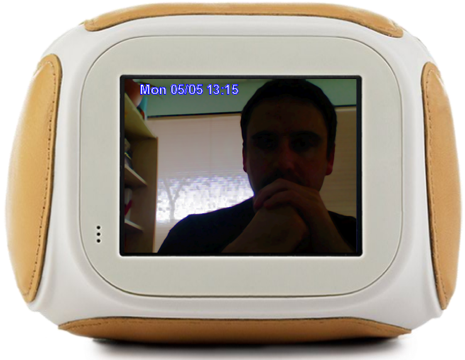
So now we have our image automatically captured and uploaded when we want it to. The next step is to configure the Chumby to display the image. In the widget selector on chumby.com, go to Webcams and then choose Load Image From URL. Put the widget in the channel you of your choice and then customize it with the URL your image is available at. Be sure to select the prevent Caching radio button.
After all that you should be "rewarded" with:
© 2005-2011 David Findlay


All opinions stated are my own, and do not necessarily
represent those of any other person or company.
All opinions stated are my own, and do not necessarily
represent those of any other person or company.